Salesforce Lightning Experience has a compelling tool called Path, designed for implementing disciplined sales, marketing, and service processes. The Path component is a graphic guide through the process, coaching reps on the key data required at each stage, as well as your custom Guidance for Success.
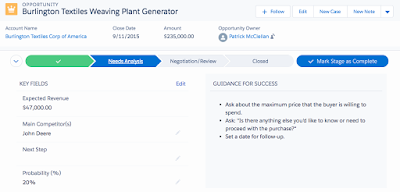 |
| Click image to enlarge. |
Conforming every opportunity to a consistent process provides you with better visibility, higher rep productivity, and an opportunity to automate processes that improve the customer experience.
The Path component drops in at the top of the page on Opportunities, Leads, Campaigns, Contracts, Orders, and your own custom objects. Each stage is determined by the picklist you have set for the Stage field, and all of the Key Fields and Guidance for Success info is customizable. Let's walk through the process. For this example, we'll use the Opportunity process and data provided in the
Lightning Experience Rollout SuperBadge on Trailhead.
There are five stages in the process: Qualification, Needs Analysis, Negotiation, Closed Lost, and Closed Won. So our first step will be to set those as the active picklist values in the stage field on the Opportunity object. Go to Setup > Object Manager > Opportunity > Fields and Relationships > Stage.
In this case, all of our five stages are already included in the default process so I didn't have to add any. However, I did need to deactivate the other values in the list, moving them to the Inactive Values list pictured at the bottom of the image.
 |
| Click image to enlarge. |
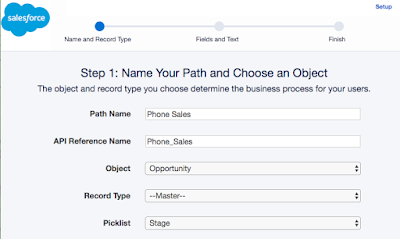
Next we need to enable Paths. Go to Setup and type "path" in the quick finder, select Path Settings. The first time you use Paths, you'll need to click the green "Enable" button, then click the big blue New Path button. If you use multiple record types, you can create a separate path for each. In this case, we'll just create a Phone Sales path and treat that as our Master record type.
Name the path, choose the Opportunity object, leave Record Type set to Master, and Picklist set to Stage. Click Next.
 |
| Click image to enlarge. |
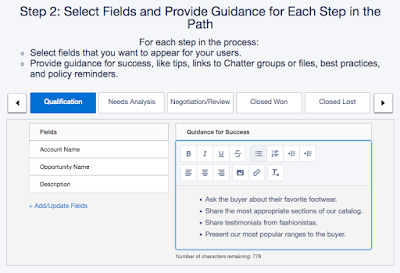
Step 2 in the Wizard is where you select the Key Fields and Guidance for Success for each of our 5 steps. Take the time to determine these ahead of time, so your configuration process is really just a cut and paste process.
 |
| Click image to enlarge. |
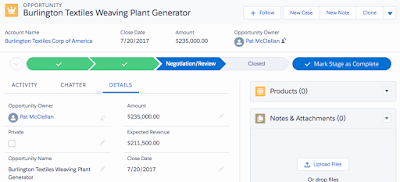
Step 3 is where you click the Active button and press Finish. Now, the new path will automatically appear on the Opportunity page. If you have multiple record types, it will only appear on the appropriate records. The graphic bar is always visible, and the detailed info is revealed with an accordion button on the left end of the bar. This allows the user to access the details when they need it, but not waste the screen space otherwise. Here's what it looks like with the process detail collapsed.
 |
| Click image to enlarge. |
Path is a powerful tool that can drive sales rep productivity, process discipline, reporting excellence and improved customer experience. If you need help defining your processes and implementing Path – and leveraging that for powerful process automation – contact me.


Useful information...
ReplyDeleteThanks.
Salesforce Lightning Training